-
Gold LED Pendant Light as a Premium Accent — How Lighting Creates Elegance in High-End Interiors 01/30/2026 13:38:51Modern floor lamps: lighting scenes and a mistake-free choice 01/28/2026 22:15:27LED Recessed Spotlights — the Invisible Heroes of Harmonious Lighting Architecture 01/16/2026 09:05:44Modern and functional track lighting02/17/2019 10:28:09
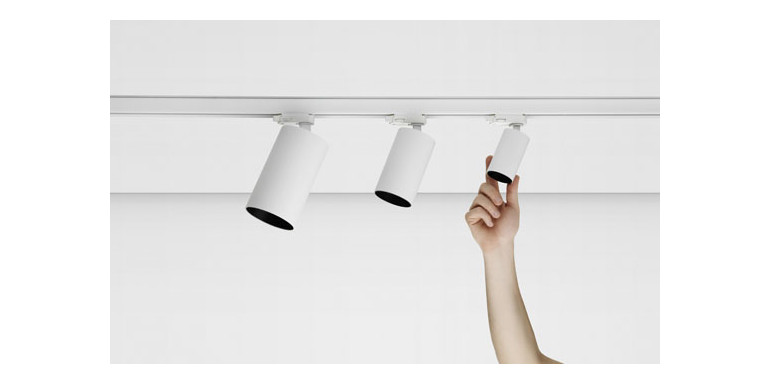
When planning a renovation or arranging a house, office and apartment, pay attention to the type of lighting that will be installed. It will affect not only how our interior looks, but also the amount of light, well-being and comfort of staying in it. The development of technology has caused that more and more people are putting on modern lighting, thanks to which their interiors will not only perfectly present, but will be really well-lit. For 2 years, we have been observing the growing interest of architects, designers and clients on lamps on rails. What are they and what is worth knowing about them and which system to choose?
Lamps on track - what is it?
Answering many people's questions, we will try to explain what track lamps are and how their assembly and power supply look like. The shortest thing to do is specially prepared aluminum rails with wires through which the current flows into which lamps and luminaires are plugged. The rails can be screwed to the ceiling, hang on ropes or let in plates with G-K, they can be cut to any length, joined in longer sections and any patterns, as well as fixed on the walls.
From normal lighting, rail-mounted luminaires are distinguished by the fact that they can be moved or unplugged freely depending on their needs. Thanks to this, it is a very functional solution and does not require any electrical alterations.
Which rail system to choose?
There are 2 basic systems to choose from: 1-phase (1F) or 3-phase (3F). What are the differences between them? System 3F is more modern, more versatile and gives us more usability, therefore it is preferred by manufacturers and users. It also means a much larger selection of 3F track lamps than older 1F. 3-phase lighting allows you to divide the whole into 3 circuits, which allows you to light only those lamps that are needed at a given moment without the need to shine the others. To take advantage of this solution, however, we must remember that the installation had more than the standard 3 wires, the division into 2 circuits requires 4 wires, and 3 circuits will require a 5-conductor cable. Otherwise, all the lamps will operate on phase 1 (like a 1-phase system) and thus shine simultaneously. The appropriate phase is selected by means of a knob on the adapter plugged into the rail.
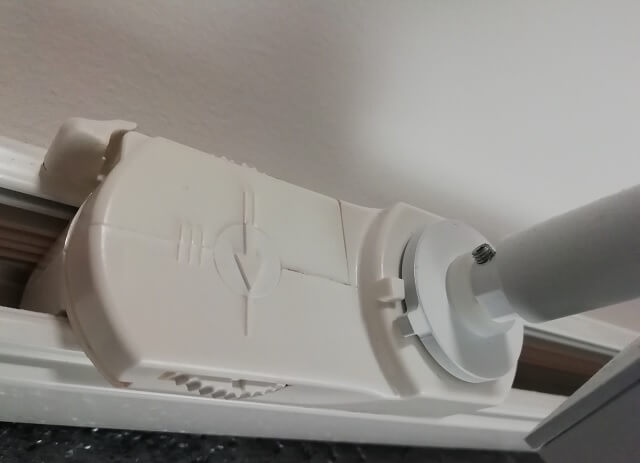
Another advantage is the length of the rails, the 3F rails are longer and appear in sections: 1m, 2m and 3m, which makes it easier to build a longer system using appropriate connectors. 3F busbars also withstand a greater load than 1F, which is important for more lamps or long systems. Track 3F lamps can also be stronger and will work more stable. The single-phase track system is only slightly cheaper, but it allows only to light all the lamps at the same time, so we can not turn on, for example, only part of the lighting. Available rails are shorter and the whole system can not be too long.
Taking into account the information mentioned above, even if our rail lighting is short, and the power cable is 3-wire and the lamps will shine together, it is still worth using a 3-phase rail system! It is necessary to pay attention to the selection of the appropriate products, i.e. 3F rail and 3F lamps at the same time, in the case of a 1-phase rail, also the fixtures must be 1 phase! In other cases, installation of such lighting will not be possible!
How to build and connect three-phase rail systems
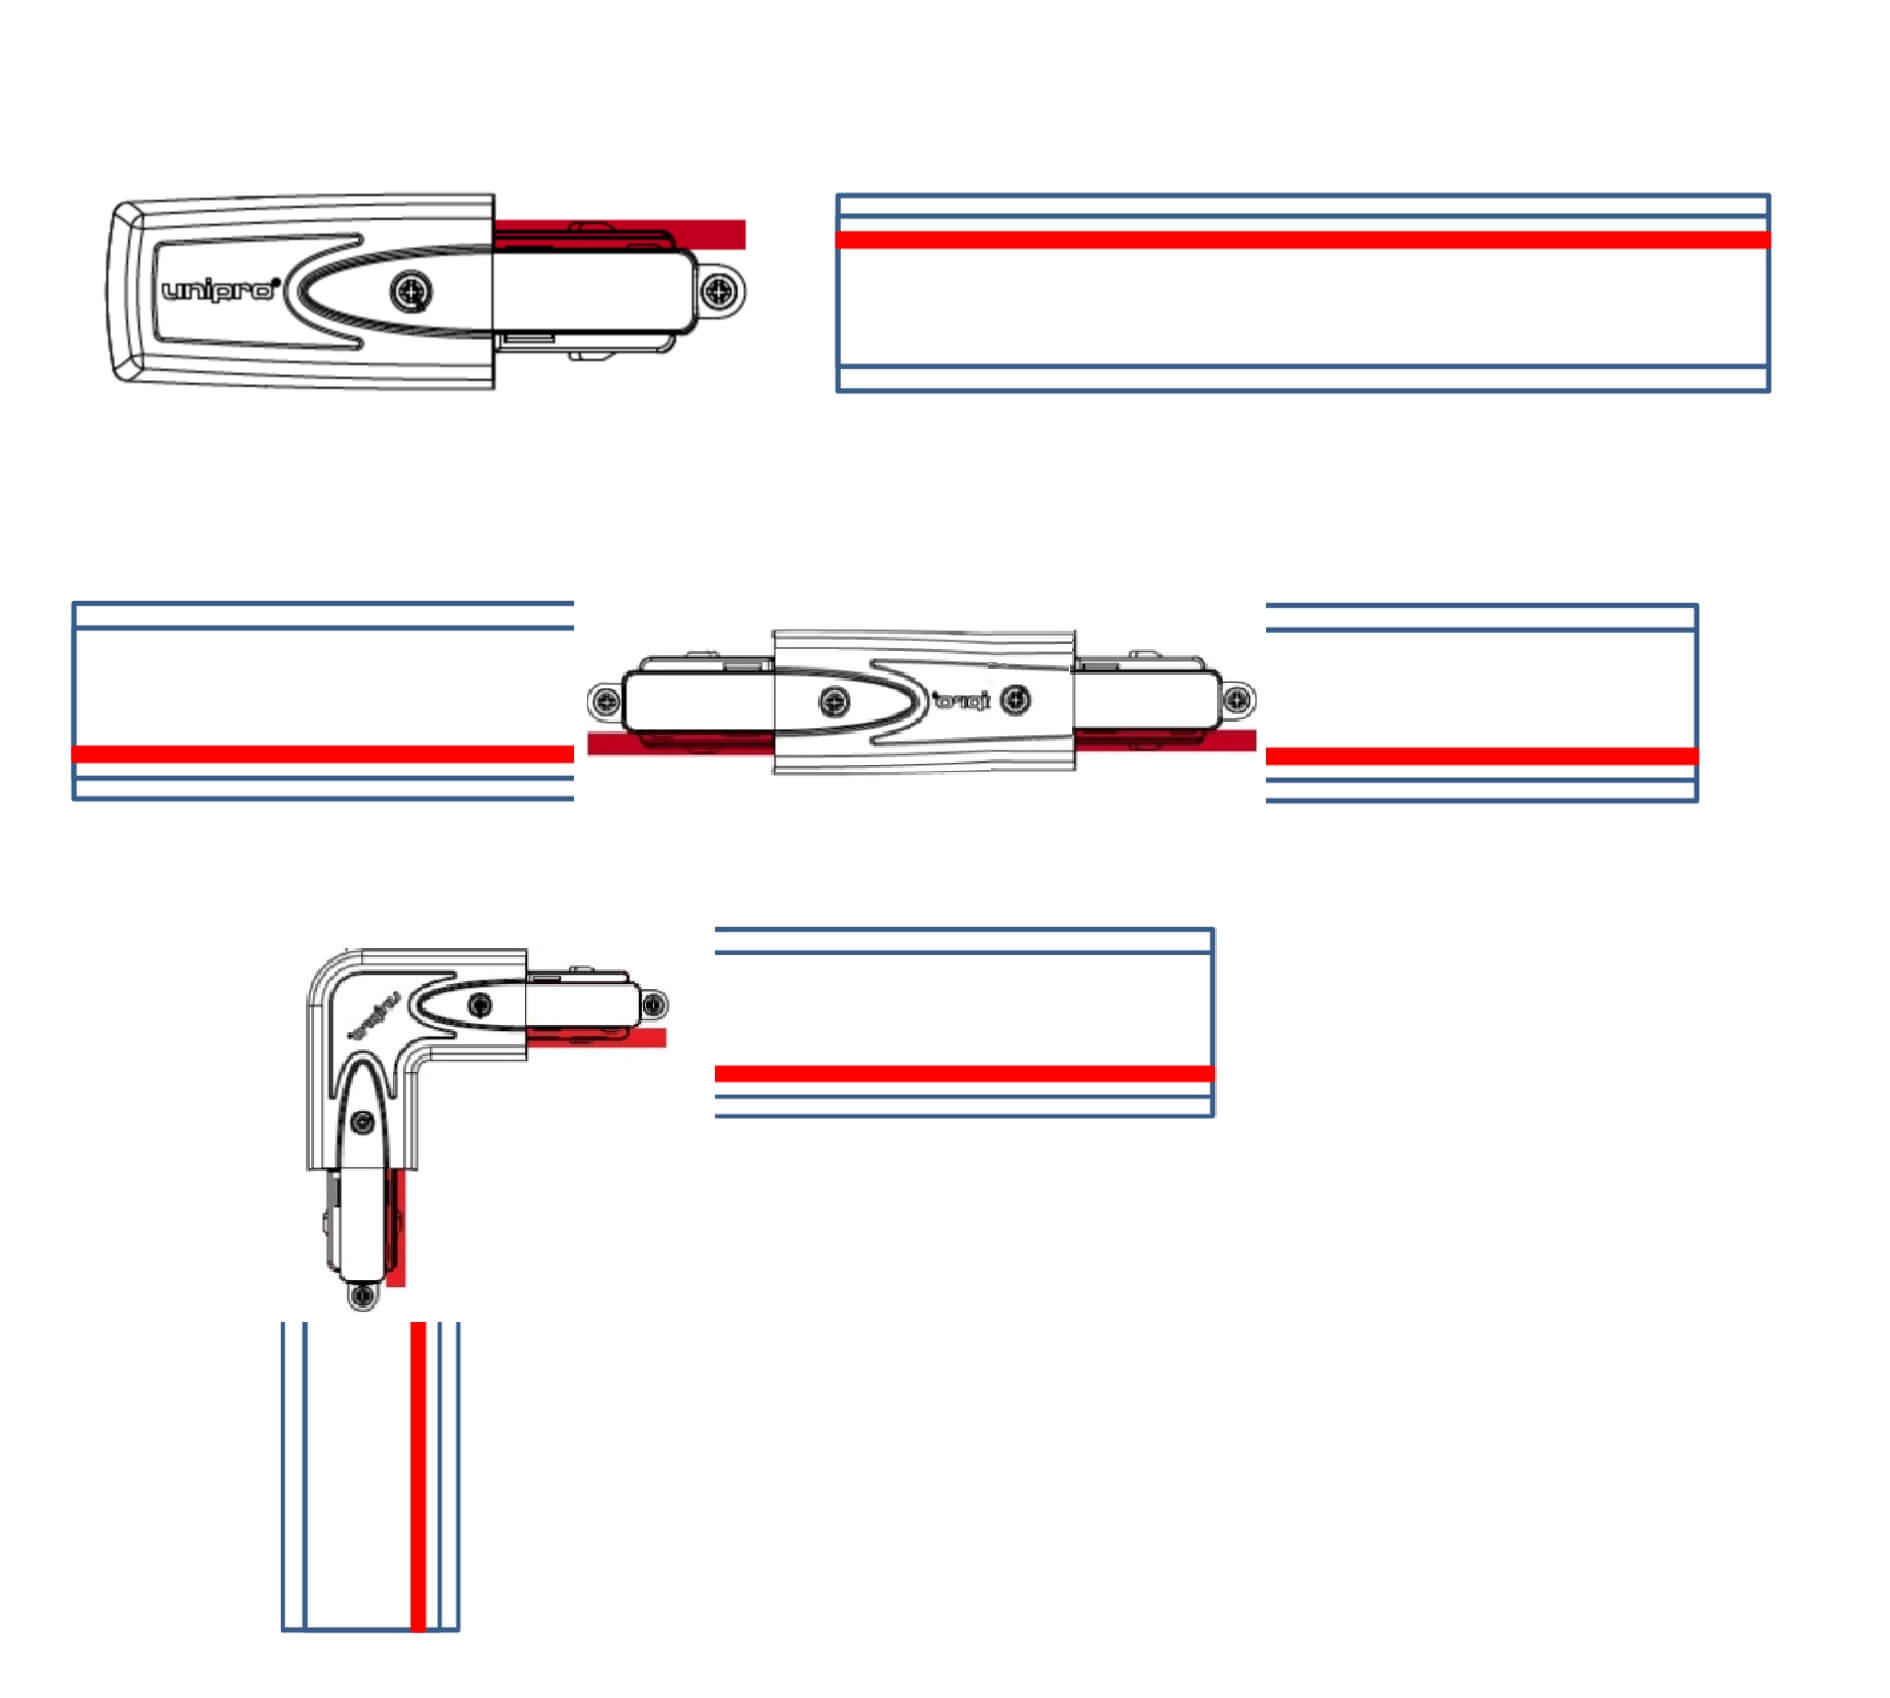
Let's try to show how to build such rail lighting. The key issue is the place of power supply to our system, i.e. the place where the wires are connected to the rails. This is done using a power terminal or appropriate connectors depending on the design. We can choose from the following power accessories:.jpg)
If the power supply is provided at the beginning or at the end of the rail, we use the power supply terminal. It is the cheapest and the simplest solution, at the same time aesthetic and if the length of the rail does not exceed 3 m the most functional, because it allows you to move the tubes along the entire length. In the case of longer sections, but maintaining the power at the beginning / end, we use the inner straight connector and add another rail. The whole end with a simple tip (end cap).
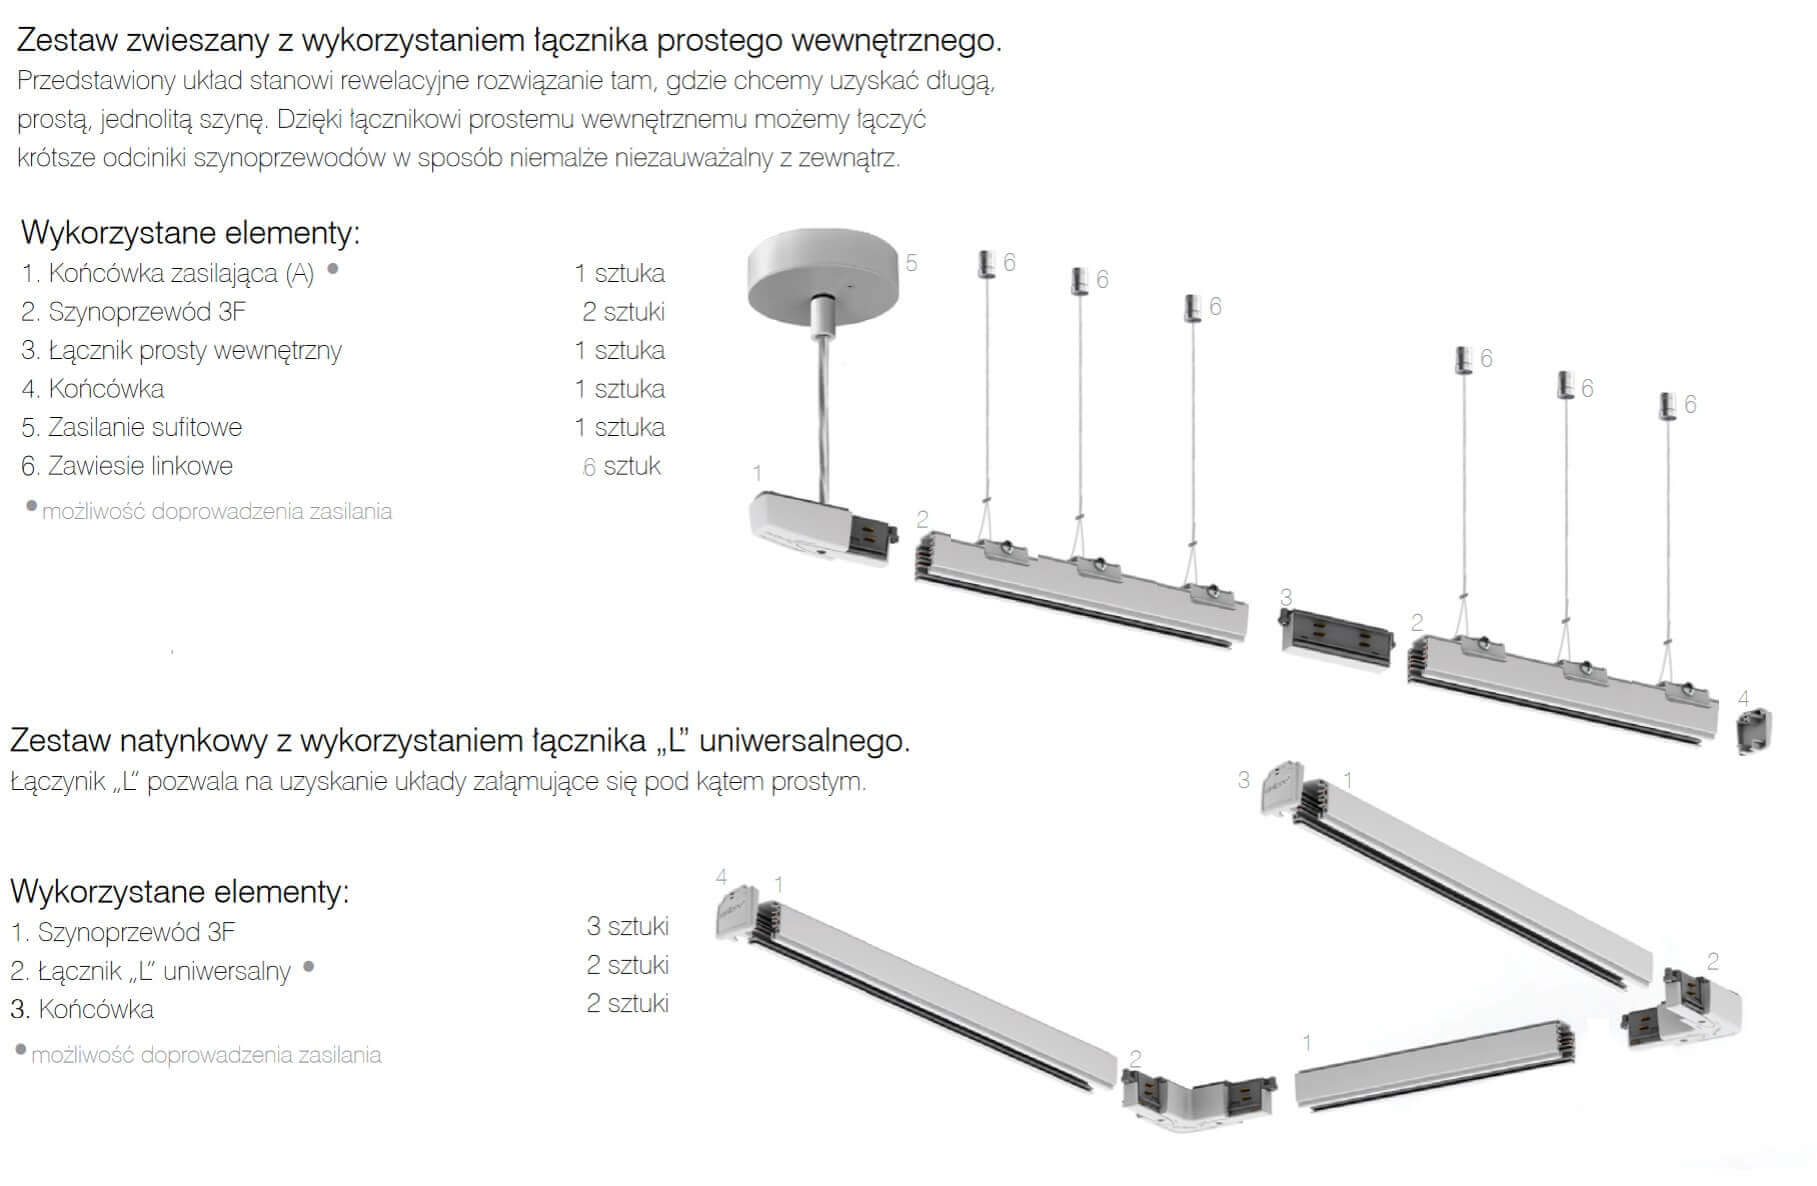
In case of power supply in another place (eg in the middle of the rail) we use a simple power connector. Such a situation often happens during renovation, when we have a ready installation after the old lamp, which was placed in the middle of the room, and we are now planning rail lighting. In the place of the wires, we install such a power connector, and to it, we connect the rails to the left and right, which should be finished with a plug.If we intend to design our lighting in the form of the letter L, U, square or rectangle, then it is best to use the universal connector L, which is an indispensable element for creating such a system and supplying it to it. The letter L or U can be fed also at the beginning or end of the rail instead of in the corner, but it will be a bit more expensive solution, because it will require a universal connector L also for the power terminal. The whole is completed by the end-plugs closing the system.
Optimally made rail lighting in the form of a rectangle or a square should look like below. Power is supplied to one, any corner. Rails longer than 3 m are connected with each other by means of internal connectors, which will practically not be visible after installation.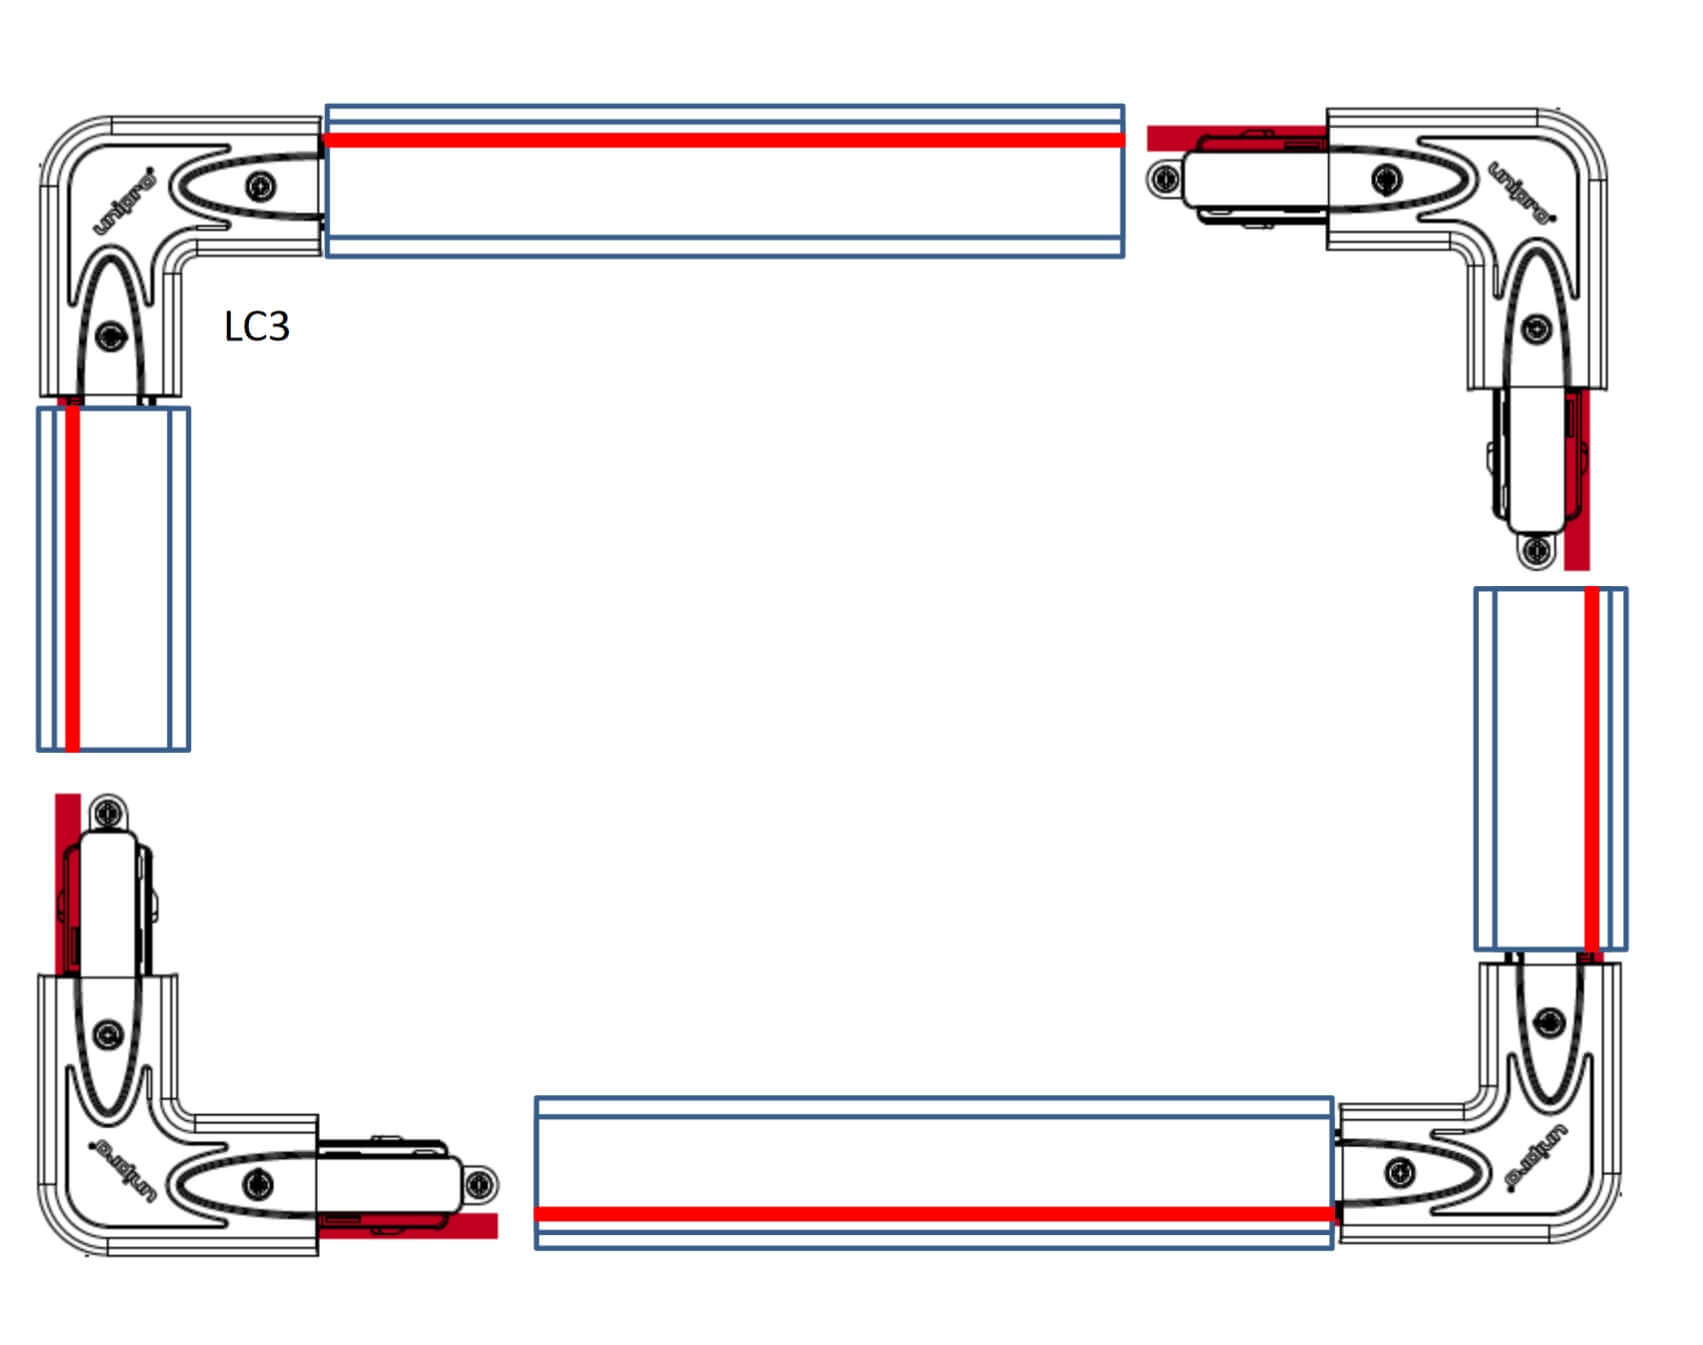
The number of available connectors, their type and connection method allow to make any lighting from 3-phase rails. The limit is actually only our imagination, because the possibilities are almost unlimited, regardless of whether our busbars are surface-mounted, embedded or suspended on ropes.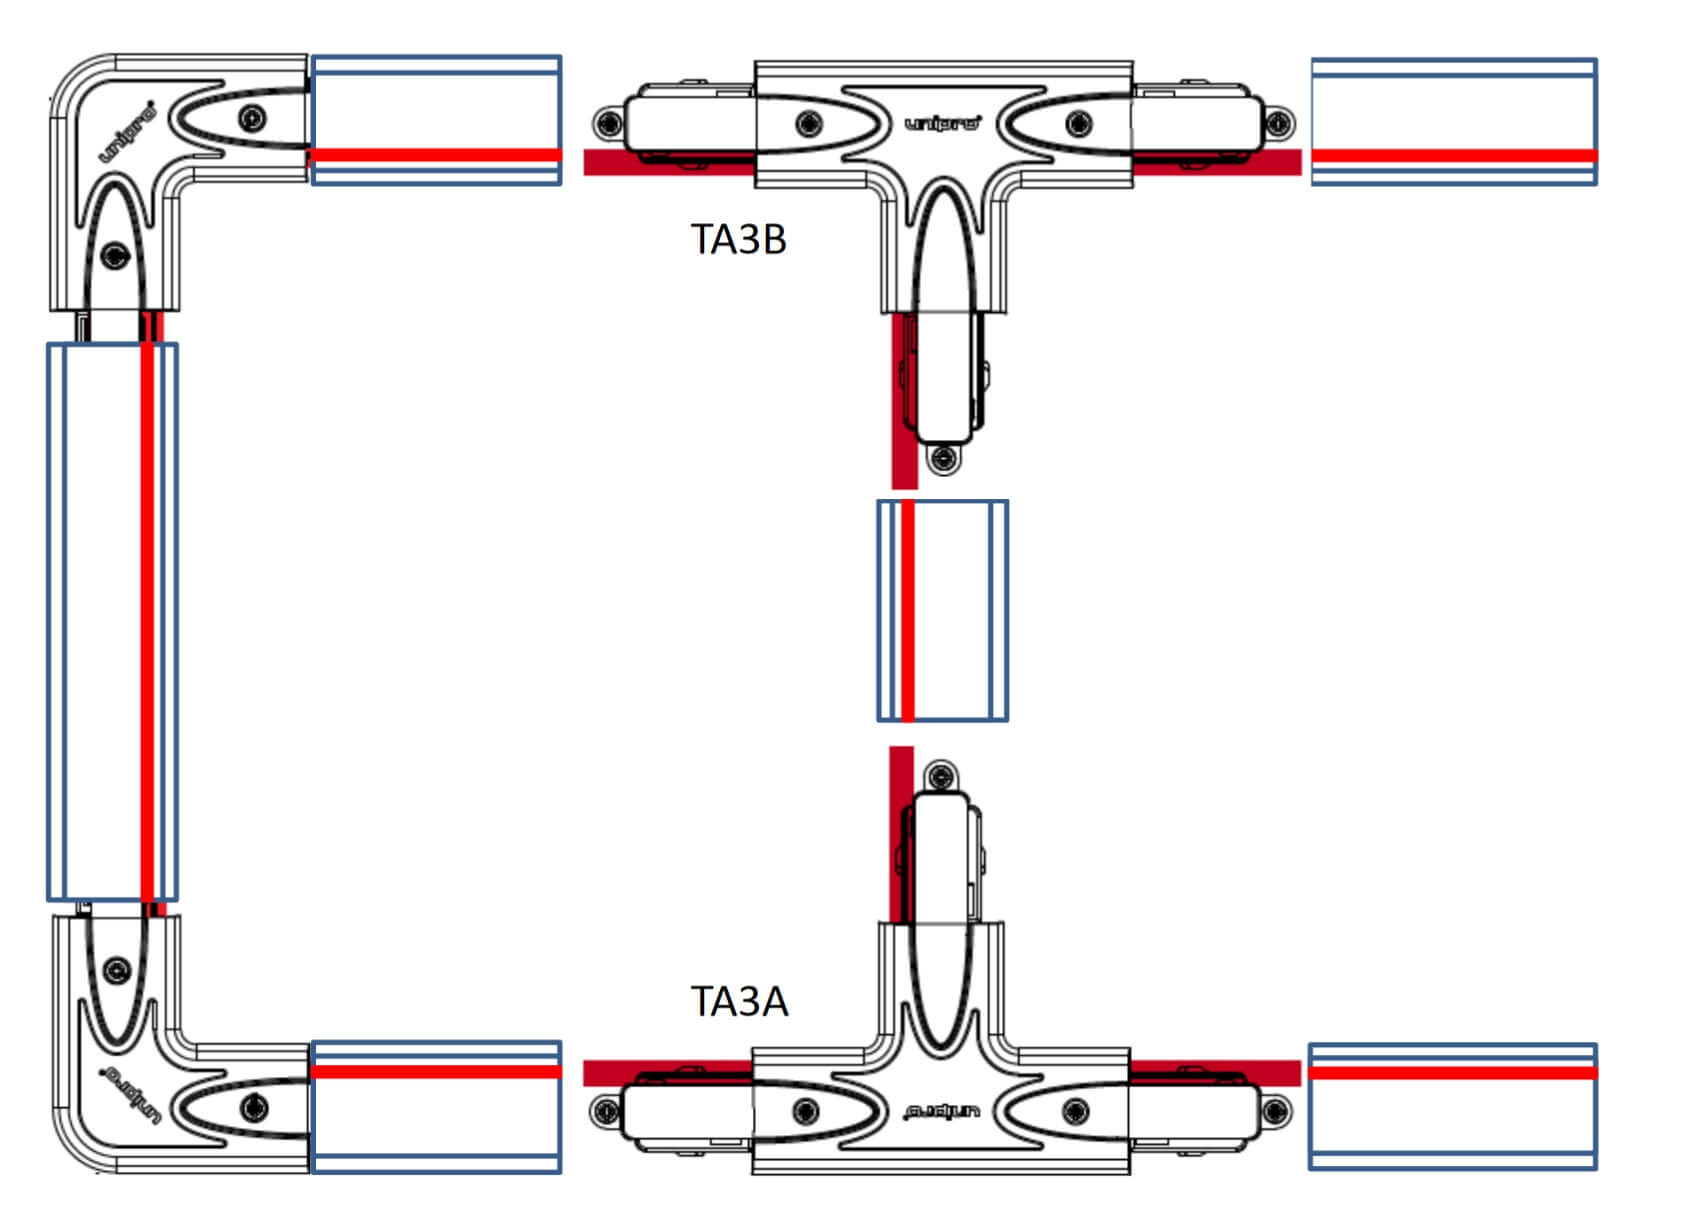
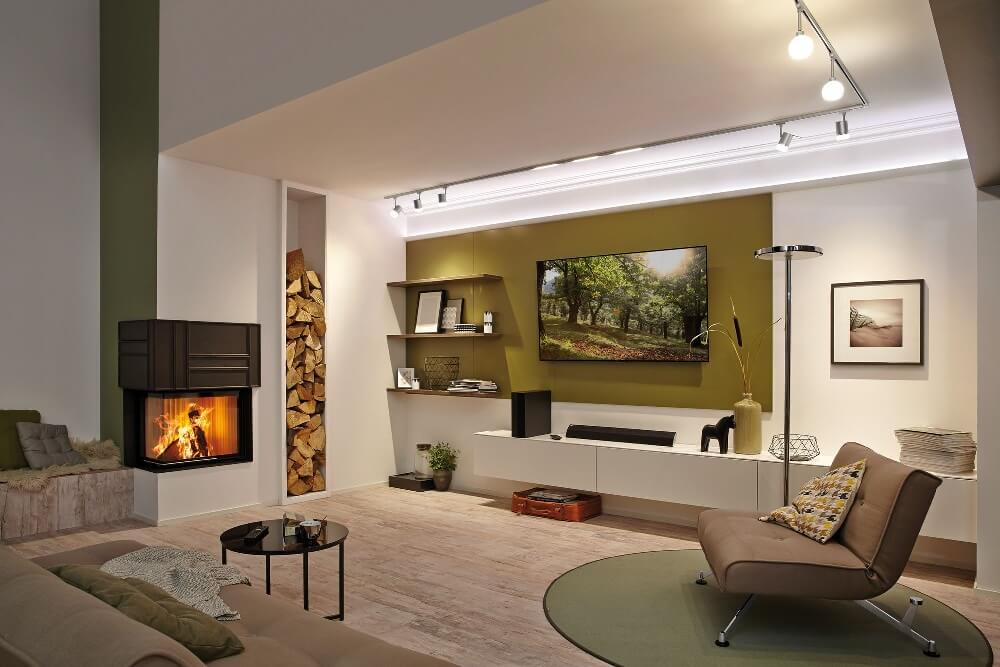
Where will the rail lamps work?
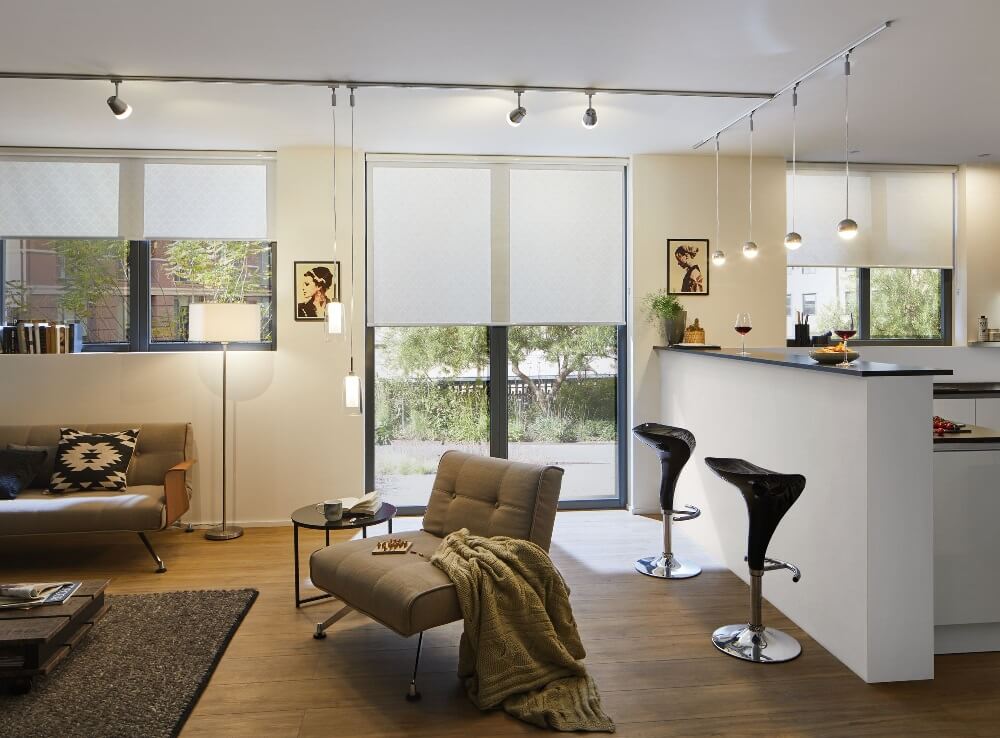
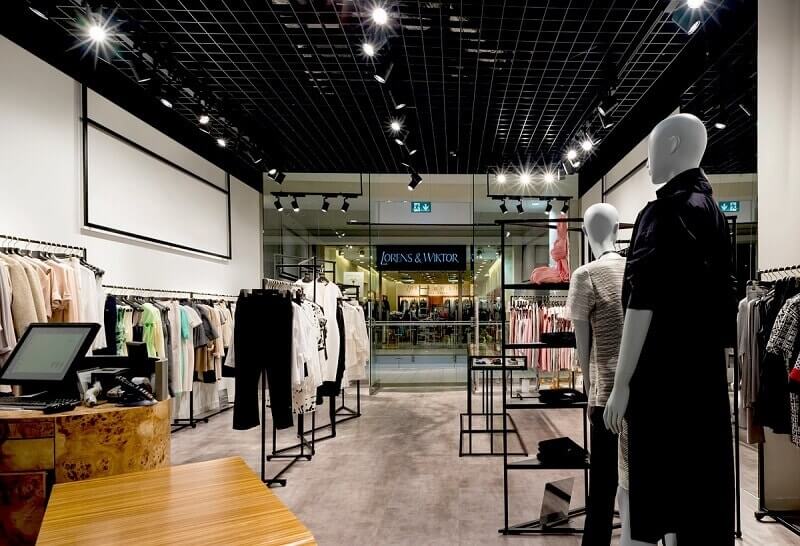
Lamps on rails is a great idea that will meet the expectations of even the most demanding customers, they will prove themselves not only as lighting in the home, office or restaurant. Very often they are the main lighting in the bedroom, living room, living room or hallway - perfectly replacing all other sources of light. However, this is not all. It happens that they are mounted as additional internal lighting, which is to help us create a climate by illuminating eg pictures or tables, or facilitate work (eg in the kitchen). It is also worth mentioning that this lighting is also used in stores where railing headlights are perfect for more effective displaying of goods.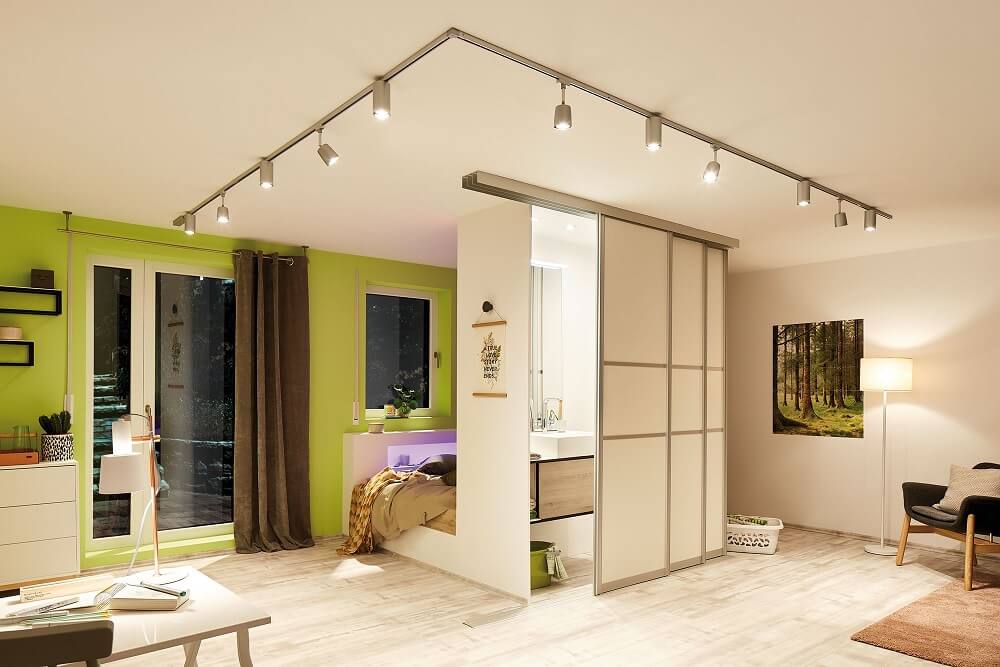
We hope that the above article helped to understand the principles of selecting connectors and power supply to build and design your own system and why it is worth choosing a 3-phase system. If you have any questions or need help in setting up such lighting, please contact our store.
shopping_cart
0
Menu
- +Outdoor lighting
- +Indoor lighting
- +LED wall lights
- Line light LED
- LED profiles ALU
- +Track system
- Multiline - magnetic track system 22mm 48V
- FIVETRACK 5 mm 48V Magnetic Tracks & Luminaires
- AQFORM Multitrack 48V - Premium magnetic Stucchi track
- 3-phase track systems
- 1-Phase Track Systems
- MINILINE magnetic track lighting
- AQFORM FLATTRACK magnetic track 48V
- +Magnetic system 11mm Micro, Core11
- Black track lighting
- White track lighting
- +LED ceiling lamps, hanging and surface-mounted
- +Ceiling covers
- +LED plafonds
- LED recessed downlights
- +Hanging lamps LED
- Ceiling spotlights and spots
- Ceiling fans LED
- LED lights for paintings
- Starry Sky
- +LED floor lamps
- LED table and desk lamps
- Living room
- Bedroom
- Dining room
- LED bathroom lighting
- LED kitchen lighting
- LED stairs lighting
- +LED bulbs
- All manufacturers
- Prices drop
- New Products
- Bestseller


10 Comments
Dzień dobry,
Poszukuję rozwiązania, posiadam już wypuszczony przewód w salonie. Chciałbym do tego dobrać szynę zasilającą, która będzie miała możliwość podłączenia zasilania na środku. długość szyny powinna wynosić 150cm. Interesują mnie również punkty oświetleniowe(jakie są możliwe modele do wyboru).
Panie Łukaszu, musi Pan kupić szynę 2m, ponieważ sprzedawane są w odcinkach 1m, 2m, 3m i uciąć na wymiar, a potem podzielić tak, aby w środek wstawić łącznik zasilający
https://www.salonled.pl/pl/oswietlenie-szynowe/6783-lacznik-prosty-do-szyn-alu-bialy-czarny.html
Jest to rozwiązanie do szyn 3 fazowych, więc musi Pan też dobrac odpowiedni reflektor do szyn 3F
Wszystkie znajdzie Pan tutaj, w przypadku wątpliwości proszę o kontakt
https://www.salonled.pl/pl/150-oswietlenie-szynowe
Witam, czy oświetlenie szynowe sprawdzi się oraz czy będzie bezpieczne w łazience?
Klasyczne oświetlenie szynowe to zasilanie 230V i nie jest zalecane do stosowania w wilgotnych pomieszczeniach, szyny i reflektory nie posiadają podwyższonych klas szczelności. Bezpieczne napięcie będą miały reflektory magnetyczne, które mają 48V, aczkolwiek też nie posiadają wysokiej ochrony przed wilgocią
https://www.salonled.pl/pl/157-multitrack-szyny-na-magnes
Dzien dobry. Interesuja mnie najmniejsze białe reflektorki z pierwszego zdjecia. Czy moge prosik o link do tego konkretnego modelu??
Dzien dobry,
Czy moglabym poprosic o informacje o jakich producentow pozwalaja zeby zasilacza znajdowalo sie na srodku szyna?
Dzień dobry
Każda szyna 3-fazowa z naszej oferty pozwala podpiąć zasilanie w środku, jeśli jest to długo odcinek to łączy się szyny, a jeśli krótki to szynę można rozciąć w dowolnym miejscu i zastosować ten łącznik zasilający, do którego doprowadzamy przewody
https://www.salonled.pl/pl/oswietlenie-szynowe/6783-lacznik-prosty-do-szyn-alu-bialy-czarny.html
jakie rozwiązanie szynowe mogę u Państwa nabyć w przypadku gdy mam 6 punktów zapalanych po 3 w kształcie litery L?
Jeśli L jest z sobą połączone i lampy mają świecić oddzielnie na każdej części to system 3-fazowy
https://www.salonled.pl/pl/156-lampy-szynowe-3-fazowe
A można to jakoś podłączyć z gniazdka?